Tuesday 29 March 2011

# 22: Muli (Raddish) Parathas

Parathas! I guess, its also known as the pan fired India flat bread..Famous in Northern India. Especially Punjab! A punjab special.. :)

Like dosas, parathas have their varieties and are served with butter, pickle, curd (yogurt).

Most famous veg parathas include: Aloo paratha (potato), Muli paratha (radish), Methi paratha (fenugreek leaves), Gobi paratha (cauli flower).. while variations have come in with Paneer, Dals,cheese etc...

Its basically a Wheat bread with stuffing.

You can also prepare amazing non-veg parathas such as : kheema (meat mince) or chicken mince. Just make sure you get the stuffing right!

Parathas have been my all time favourites..and i can have them just about any time of the day...I just need a reason to prepare it! And so..i managed to find one today. I do not like radish! Can't tolerate the gaseous-ness it produces..neither do i like it cooked as a vegetable nor eat it as is as a salad. The only possible way i will have it is.. as a paratha.. and thus, i went on with my menu for the day!
" Muli Parathas"

I shall describe the procedure to prepare with visuals..as i think that's possibly the best way to communicate.. You can register it better!

Ingredients:
  1. Muli (Radish) -2 
  2. Red chili powder - 1 tsp
  3. Turmeric powder - 1/2 tsp
  4. Salt - 1 tsp
  5. Wheat flour to prepare the Dough - 2 cups
* you can also add coriander leaves, and green chilies rings..if you like!

Procedure:
  • Grate the radish & extract the excess water from it by knoting it in a muslin cloth. Keep it in the muslin for a while. Remove just before you are about to prepare the stuffing for the wheat bread. (Its done so, as radish leaves out a lot of water, and if you add salt and keep it for long the stuffing will get soggy..)
  • Prepare the dough using wheat flour, a pinch of salt, and water. Make small portions as shown in the figure below. 
  • Now prepare the stuffing. Remove the radish from the muslin. Add turmeric powder, red chili powder, and salt. Mix using a fork.

  • Now roll out 2 doughs, and roll them into small sizes. But with one a bit bigger than the other. ( I prefer doing the stuffing this way, as its a lot more easier and less clumsy too!). Spread the stuffing on to one of the layers. And seal it using the 2nd layer.

  • Roll the layers together folding them on and off in wheat flour.

 
  • Heat a pan/tava and place the paratha on it. Smear oil/ghee, and toss it till it cooks.


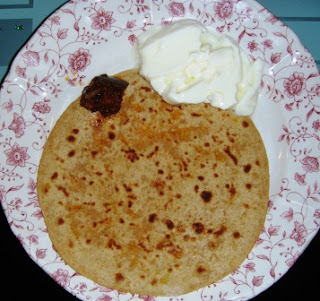
Serve with Curd & Pickle!..( add a cube of butter too ..;) , you can also have it with tomato ketchup if you like! ) 


Njoi .... :)


# 21: Sambaar

Its the best combination with idili, dosa, & vadas...

Its nutritious while easy to prepare and quick.. I Know one thing, once you make saambar..i do not need to make any additional vegetables. Its that easy and quick for me! :)

Ingredients:
  1. Arhar dal (yellow pigeon peas) - 1.5 cup
  2. Tomato - 1 (cut into 4)
  3. Radish - 1 (cut in circular rings)
  4. Lady's finger (Okra) - a few ( cut at a length of  1 inch)
  5. Drumstick - 3 ( cut into pcs of 3")
  6. Sambaar powder - 1 tsp
  7. Asafoetida (heeng) - 1/4 tsp
  8. Tamarind Water - 1 cup
  9. Mustard seeds - 1 tsp
  10. Curry Leaves - 1 stem
  11. Garlic - 2 pods (crushed)
  12. Dried Red chilies - 2
  13. Salt to taste
Procedure:

Cook the dal. Add the vegetables (tomatoes, radish, okra, drumsticks). Also add the sambaar powder and tamarind water. Leave it to cook. Once you get the aroma, you so know it that the dal is cooked! Add salt as per taste.

Now add the tadka* (tempering) to the sambaar.

* Preparing the tadka: Add oil into a pan and leave it to heat well. Once hot, put in the mustard seeds, curry leaves, dried red chilies, asfoetida, and crushed garlic.

You are all ready! 

:)

# 20: Idli & Dosa

Most Famous 3 time meal (if u wish) catered from the southern part of India...

I have teamed the two together as the preparation is one and the same. While Idli is put into the moulds, Dosa is prepared on a flat tava...and is a beautifully rolled out paper.. ;)

Visit Southern India, and ask what's famous.. and instantly you would be looked at with raised eyebrows and a smile converting down to a saying..."Madam/Sir, Idli or Dosa" :)

What's wonderful about dosa is the variety it can offer..
  • Plain dosa
  • Paper dosa
  • 70mm dosa
  • Masala dosa
  • Rava dosa
  • Steamed Dosa
  • Palak dosa.. the list is just endless. I think the saleability and demand has been kept up to by the variations it can offer. Suiting the tastes of everyone alike!
The two are served with Coconut/groundnut/mint leaves/tamarind-ginger Chutney and Sambaar ( A daal with vegetables)


Ingredients:
  1. Rice - 2 cups
  2. Urad Dal ( Vigna Mungo or white lentil) - 1 cup
  3. Cooked Rice - a handful  Or Methi (Fenugreek) powder - 1 tsp
  4. Salt to taste
Procedure:

Soak the rice and urad dal (separately) over night. Later grind the two separately. While grindng the rice, add the cooked rice or Methi powder. The mix should not be too coarse nor too fine (actually, rather ideally the batter for idli is a bit coarse while for dosa its supposed to be very fine..But since I prefer making life a bit easier, thus i make sure the batter is used for both the dishes...).
Add salt just before cooking.

For Idli: Grease the moulds and add the batter to it. Steam for 15-20 mins. (The needle comes out clean on pricking the idli. And thus you know its cooked and ready!)

For Dosa: Add a little water (just a small glass). Mix well. Heat the tava and grease it too. Make sure you don't pour in too much oil ( else the batter will not spread evenly! I would suggest you can cut an onion into half and pierce it with a fork. Dip the onion in the oil and just smear that on to the tava... It will just put the right amount of oil.. )

Put a spoon full of the batter on the tava and spread it starting inside out (in a circular manner)...

Cover with a lid and let it cook with the steam.. The dosa will automatically leave the edges and make life easy for tossing over to the other side!

Ta da... The idli & the dosas are ready!

:)

Monday 28 March 2011

The Inspiration & Motivation

The Food Feista... Part-1

# 19 : Honey Ice Cream

A few months back, I was watching the show "Chew" by Nigella.. i guess i am a complete fan of hers now..  And this recipe is one of her easy creations which i did try out the other day..and to my surprise..i now know to make ice-creams... ;)

Hurray!
So here it goes...

Ingredients:
  1. Double cream - 340 ml
  2. Sugar - 2 Tbsp
  3. Honey - 100 gms
  4. Egg - 1
  5. Egg yokes - 4
  6. Nuts
Procedure:

Beat up 340 ml of cream with sugar. Be careful while you do so.. too much might turn the cream into ghee!
Take a Hot water vessel, on top of which keep another bowl containing the honey, 1 full egg, along with 4 yokes. Beat the mixture well.

Now, add the honey egg mix into the cream sugar mix and using a spatula.. Mix the two well.
Take a bowl and line it with a thin transparent paper or butter paper. Pour the final mixture into the bowl. Cover it with a thin wrap and freeze.
Once its frozen, turn over and remove the butter paper. Before serving, decorate with Honey streaks and nuts sprinkled over!

Ta da!


Njoi! :D

# 18: Mexican Fish Curry

Hmmm... Mexican Fish Curry!!! What is it that would strike your mind? A dish with probably lot of spices.. spicy! a bit complicated.. a zillion thoughts ain't it?

Well, i have developed a fetish for cooking apart from just eating.. ;) And considering this, i mostly end up browsing TV channels a lot more than i used to. Let me tell you..i am equally an idiot box fan! 

While i was doing my regular browsing, I happened to find the channel and show that just glues me to it.. "afc"- Asian food channel. & the show " Forever summer with Nigella"

Nigella is a wonderful chef! I have been following her culinary shows even on travel & living..& i remember the show as "Chew"

Last week, Nigella had some of the easiest & loveliest recipes to show case.. one of them being " The Mexican Fish Curry"...and i tried it out..and trust me..it was simply WOW!  and i would love to share the same with you.

Thanks Nigella! :)

Ingredients:
  1. Oil - 1 Tbsp
  2. Onions - 2 medium sized
  3. Salt - 1.5 tsp
  4. Turmeric - 1 tsp
  5. Cumin - 1 tsp
  6. Red chili  - 2 ( cut in circular rings)... although i have used green chilies.. :)
  7. Ginger  - chopped
  8. Coconut milk - 2 cups
  9. Tamarind water/ paste - 1 cup
  10. Water - 250 ml
  11. Fish

Procedure:
  1. Marinate the fish using 1 tsp turmeric & salt.
  2. Now, prepare the sauce. Which includes, coconut milk, tamarind water/paste, & 250 ml water. If you have concentrated fish stock. Do add it in.
Take a pan, add the onions into the hot pan of oil. Let it turn golden brown. Now add the ginger, salt, turmeric, cumin, red/green chili. Mix well. Add the sauce, and leave it to cook on low flame. (I love cooking fish in the earthen pot.. )
Once the curry boils, add the fish.


5 Mins & the Mexican Fish Curry is ready to be served with a bowl of steamed rice...


Bon Appetite!
:)

# 17: Manglorean Fish Fry

I was not much of a fish eater. I do like fish.. But not someone who will die for it! But after having eaten some nice fresh fish after moving to southern India.. I have taken a liking for it.

Fish fry is something I just cant resist.. May be i just have an affinity for carbs... ;)
But then its ok!

Fish fry, like any other fried dish..is simple & quick. All you need to make sure is.. get the marination right & perfect!

Ingredients:
  1. Red chili powder - 2 tsp
  2. Turmeric powder - 1 tsp
  3. Pepper powder - 1/2 tsp
  4. Cumin powder - 1 tsp
  5. Lime/ vinegar - 1 tsp
  6. Fish
  7. Salt to taste - 1.5 tsp
Procedure:

Mix all the ingredients well and marinate the fish. Leave for an hour or 2.
Shallow fry the fish in a pan & we are all set.. :)


Variation for marination:
  • You can marinate the fish/prawns with just ginger garlic paste, red chili, turmeric, salt, & vinegar/lime.
  • Or, marinate it with red chili, turmeric, cumin, salt, & crushed garlic pods.

NJOI!

# 16 : Manglorean Fish Curry

Mangalore (Karnataka, India), is a coastal area. While its known for its natural beauty and serenity.. its is also well known for its FOOD. And manglorean food is known for the ingredients used. Most of it includes coconut, rice, curry leaves, ginger, garlic, and chilies. :) Its spicy..but its worth it!

Non-veg (especially fish) is cooked in earthen pots down south. And trust me, until i tasted the curries prepared in different vessels.. i did not quiet know what i was truly missing out on.. I would recommend cooking fish in an earthen pot always.. its simply delicious..and the aroma is ....."to die" for..

Okay..so here's how we prepare it..

Ingredients:
  1. Coconut - 1/2
  2. Onions - 2
  3. Red Chili powder - 2 tsp
  4. Ginger Garlic paste - 1 tsp
  5. Pepper pods - 4
  6. Turmeric powder - 1 tsp
  7. Tamarind water
  8. Green chili - 2 (spilt into halves)
  9. Vinegar- 1 tsp
  10. Fish
Procedure:

Grind the coconut, 1 onion, red chili powder, ginger garlic, pepper pods, turmeric powder together with the tamarind water.
Now, pour the above mixture into the earthen pot, and add green chilies & the finely sliced onions. Let the gravy cook together until the aroma starts to spread.. You know its cooked with the aroma! ;)

In case the gravy is too thick add a glass or 500 ml of water. Add the fish. It will just take 5 good minutes for the fish to cook.

Lastly, add vinegar!

Ta da!

For pics:  http://aparnatelang.blogspot.com/2011/02/food-feista.html

# 15 : Appams


Appams is a variation to sannas. All you need to do is... Mix a bit of water into the batter and pour a spoon full into a hot dome pan (greased very lightly). Hold the pan with both your hands and move the batter such that it moves onto the sides of the pan.

Cover with a lid for a while and when you open it, you wil notice the crispy edges coming off the sides..and you know your yummy appams are ready to be served with coconut milk & sprinkled sugar or fish/chicken curry or even sarapotel "pork curry"

Just a recap of the ingredients.... 

Ingredients:
  1. Rice - 1 cup
  2. Coconut - 1/2 cup
  3. Cooked rice - 1 cup (or one handful)
  4. Yeast - 1 tsp
  5. Sugar - 1 tsp
  6. Water - 1 cup
  7. Salt to taste
Procedure:
  1. Grind the rice, coconut & cooked rice together.
  2. Soak the yeast in water and add sugar to it. Wait untill it bloats.
  3. Add the yeast to the rice-coconut mixture. Keep it overnight.
  4. Add salt and little water just before preparing.
Njoi!

Pictures on :   http://aparnatelang.blogspot.com/2011/02/food-feista.html

# 14 : Sannas

Yumm!!!!

Sannas look a lot like idlis but the ingredients vary a bit. Also the taste is amazingly different. There's always a coconut flavor. Its also steamed! what is also beautiful about this dish is the honey comb structure that you would see when u slice a piece out.

This dish is famous among the manglorean christians. Very famously served and eaten with "Sarpotel" (Pork curry)

Ingredients:
  1. Rice - 1 cup
  2. Coconut - 1/2 cup
  3. Cooked rice - 2 cups (or one handful)
  4. Yeast - 1 tsp
  5. Sugar - 1 tsp
  6. Water - 1 cup
  7. Salt to taste
Procedure:
  1. Grind the rice, coconut & cooked rice together.
  2. Soak the yeast in water and add sugar to it. Wait untill it bloats.
  3. Add the yeast to the rice-coconut mixture. Keep it overnight.
  4. Add salt just before preparing.
  5. Take a vessel and grease it. Pour the batter in.
  6. Steam for 25 mins & its ready! 
When u prick the dish with a needle, make sure the batter does not stick on it. If it does, you will know it has to be steamed for a while more..

Njoi!

http://aparnatelang.blogspot.com/2011/02/food-feista.html

# 13: Puttu

http://en.wikipedia.org/wiki/Puttu

I know Puttu as a dish that would at least be prepared once in a month by my mother. A dish famous in the southern part of India (Chennai & Kerala). I guess, mom learnt coz of her association with "Madras" , the now Chennai. It was her schooling destination.

We also come from the south of India. But Puttu does not belong to our region.. ;) Its funny how every 100 meters there's a change in language, cuisines, culture..just about everything. But what is interesting the way we all come together! :)

Anyways, coming to the recipe... My mom is extremely fond of this dish and when you are away from home.. i guess one tends to long for some things a lot more than anything. We apparently, long for the various dishes we love.. ;)

Ingredients:
  1. Rice Powder - 1 cup
  2. Grated coconut
  3. Water - 30 ml
  4. Salt to taste
Procedure:

To the rice powder, add 1/2 tsp of salt, and 30 ml of water. Sprinkle the water on the rice powder and mix. The mixture should not be too wet or too dry or sticky.

Take the puttu making cylindrical jar and add the layers as follows:

Layer 1: grated coconut
Layer 2: rice powder mixture
Layer 3: grated coconut
Layer 4: rice powder mix
Layer 5: grated coconut

Steam for 15 mins & its done.. :)

Serve with coconut milk, sugar, & Banana.


(pic courtesy: google images)


P.S:
In case you do not have Rice Powder readily available. You can prepare it at home.

Soak the rice in water for a while. Later place it on a cloth and leave it to dry. The rice should not be too dry. Let it be a li'l damp. Grind the rice in a mixer. Sieve & roast in a vessel.

Also, you can prepare Puttu using Ragi "finger millet" powder. Ragi is known to be extremely nutritious and is probably a staple food for babies after cereal's! :)

Thursday 24 March 2011

# 12: Burger Basket!

India Vs Australia...Phew! its gonna be one heck of a match.

Yesterday was Pakistan Vs. West Indies.. :) Was busy watching the match when, bro came in bringing packets of buns along! The plan was to eat the bun as is with some gravy or so.. we were so engrossed with the match that thought "a leave" from kitchen should be okay for a  day! ;)

I don't know what happened to me seeing the buns... I was all energised and volunteered to make the today's dinner! I am not sure if i should call it an English dinner.. But yeah! it was one.. An English treat! ;)

Decided. Burgers it is.

When i think of burgers, all i can think of is the yummy burgers you get at Mc Donald's. Even the veg burgers are delicious. Its Lent.. not like we fore go non-veg completely..but ya we try to. So here i began preparing the veg burgers.

My Burger Basket..


Cutlets:

Ingredients:
  1. Boiled Potatoes - 8 to 10 medium size
  2. Soya chunks/granules - 1 cup
  3. Green chilies - 4 (cut into circular rings)
  4. Ginger Garlic Paste - 1 Tsp
  5. Garam Masala - 1 tsp
  6. Red chili powder - 1 tsp
  7. Salt to Taste
Procedure:

Add the soya chunks in to a bowl of boiling water. Leave it for 15 mins. Once its swells up. Strain the water and squeeze the water out from the chunks using a muslin. Make sure you have squeezed the water out properly else the mixture will be soggy and the cutlets wont get formed. Grind the chunks in a dry mixer.

Mash the potatoes. Add the soya and green chilies and mix well. Add the ginger garlic paste, red chili powder, garam masala, & salt. Mix well. The Cutlet mixture is ready.

Form oval cutlets and roll the cutlets in bread crumbs. The bread crumbs not only will act as a binding agent but also will give the cutlets the required golden glaze and crunch.


Preparing the bread crumbs instantly:

Take a few slices of bread, break it up and grind in a dry mixer. The crumbs are ready. :)


The last stage: Burger Presentation

  1. Tomatoes (cut in rings)
  2. Onions ( cut in rings)
  3. Cucumber (cut in rings)
  4. Butter
  5. Mayonnaise
  6. Pepper
  7. Toothpick.. to hold the burger together.. ;)
(P.S: You can also include lettuce, olives, jalapenos...mustard sauce...)

Ta da.. My burger basket is ready!

The meal turned out be great as we paired the burger delights with mushroom cream soup..while post dinner dessert was my all time favorites.. "Caramel Custard" ;).. Top it all ..A very important match!!!  Our dinner began when Australia's innings got over..and they had a break too... n we were right in time for the Indian innings....LOL!!! 

In our family, meals are never eaten just coz its part of a routine...n m glad with the match on we still could enjoy the grub.. :D


# 11 : Simple Bacon Grubs!

Last nite, i was browsing through some channels when i stumbled upon a channel called "afc" -Asian food channel.  Everyone in my family quiet enjoy watching this channel. Not like anyone has ever prepared any of the recipes shown... But its nice to just sit back, relax, & watch asia's yummy foods.. I guess its not always important to prepare every single recipe you see..but its just a lot more fun at times to just watch and enjoi. :)

I was watching a show called " Chuck's Day Off"..It was simply amazing... u can take a look at the site too...

http://www.asianfoodchannel.com/
http://www.youtube.com/watch?v=I6Vrk5p51Sc

Straight after the show, i can't seem to recollect  the name of  a 5 min show that came up...telling how well bacon could be used and prepared with ease.. I am just penning down the same.. "verbatim!"

Recipe# 1: Bacon with Asparagus


Procedure: Wrap the bacon strip around the asparagus stem and sprinkle salt & pepper. Place in a hot oil pan and shallow fry. Roll over gently. Ready to Serve!

Recipe # 2: Bacon wrapped over stuffed prunes


Procedure: Slit the Prune, and stuff the prune with a piece of cheese (of your choice). Now take a bacon strip and wrap over the prune. Sprinkle a li'l salt. Shallow fry the prunes. Toss over gently. and ready to be served!

Recipe# 3: Bacon wrapped over Chicken Breast


Procedure: Take the Bacon and stretch it out using the knife in order to increase the length. Now take a chicken breast and wrap the bacon over it. Sprinkle salt & pepper. Shallow fry it & it all ready!!!


Honestly, I do not eat Red meat. I am more of a fish & chicken eating person. But i cant be biased! I liked the simplicity with which Bacon was cooked and the variety it could possibly offer. Its the first time i have even watched a TV show showing bacon preparations.. Its nice!


For those of you, who are not choosy on the type of meat you would grab on to.. I would definitely suggest you try these out too. While i would try the same out with chicken.. ;) Also, i love a lot more spices.. may be you can add more to the dish by sprinkling some oregano, chili flakes, or so. rather than just salt & pepper..

Bon Appetite! :)

P.S: Images Courtesy Google images... God bless Internet!

Wednesday 23 March 2011

# 10: Spinach (Palak) Soup

What comes to your mind when you hear or see "SPINACH"???

Well..for me...Spinach can only remind me of Popeye!!!! ha ha ha ....

I love and enjoy watching cartoons. I think they are the best stress busters and source of complete entertainment. And definitely any day better than watching those glycerin filled daily soaps... ;)

I like soups. More so also coz they are filling and nutritious...

With me putting on some (rather a lot ) crazy amount of weight and no time to cook a decent meal on returning from work, i took the easy way out of eating some heavy breakfast and lunches..while resorting to only soups and salads for supper. I know its crazy that i can even come up with such an explanation..but honestly, that's what i ended up doing.. And thanks to the latest quick fix scenario, we can just get anything up and done in 5 mins.. "hail soup packets".. Not like i reduced even 1 gram of weight with my ideas!!! ....

It was during this time that many a times i was scolded for my idiotic-ness by my close friends. One of them even going to the extent of telling me how not so good it is to have soups made from soup packets.. :( sob! sob!
It was then that i "hell" miserably missed the soups i had as a kid.. when soup packets did not exist and mom stood in the kitchen sweating it out even to prepare a good soup (with bread crumbs & dash of cream )for us.. Sigh! how i missed being a child...

Nevertheless, now i decided..i won't let the chemicals wack my system up.. and with all the cooking i can definitely soup(oops! cook) up some soup.. :D

Palak soup being a hot favourite! (although i would love mixed vegetable clear soup for the no hard work and no pain that it provides me with..but then here it is..)

Presenting... "The Spinach (Palak) Soup"... Ta da!!!! ;)

Ingredients:
  1. Spinach Leaves - 10 to 20
  2. Onion -1
  3. Green Chillies - 1 or Pepper powder - 1 tsp
  4. Ginger - 1/2 cm
  5. Tomato - 1
  6. Salt to taste


Procedure:

Wash the Spinach in salt water to remove the sand from it. (Honestly! i am mentioning this cause its important that you know that most doctors advice renal/kidney stone patients to stop eating spinach.. Incidences of stones are also related to the cooking hygiene and all...So its better you wash it properly or you are calling for problems..)

Take the washed spinach leaves + pepper + onions+ ginger + tomato + salt and pressure cook. Just a whistle!
Cool & strain. Now grind the mixture. Add the paste to the strained water (stock) and boil. In case its too watery, add a spoon of corn flour mixed in water. Boil the soup.

Bread Crumbs (Roast the bread pcs and fry..)

Ta da..the soup is ready! :)

Serve with a dash of cream on it and a few pieces of fried bread crumbs!


Variation in serving: Take an egg, beat it up and while the soup is boiling... pour the beaten egg into the soup in a circular manner!

:)

# 9 : Butter Cake

Others: Cake? U? R u sure u wanna do it?
Mom  : Let her..
Me     : Absolutely!!! :)

I have seen mom bake some amazing cakes & pastries. Cakes like butter cake, sponge cake, marble cake, oil cake, vegetarian cake, Pineapple cake, mermaid cake, humpty dumpty cake, rabbit cake, basket cake... WOW!

The inclination to cook comes with the desire to be able to bake cakes & cookies, and prepare puddings, ice-creams etc.. Somehow, i have understood the natural psyche of anyone who wishes to cook..wants to first be able to make those wonderful desserts even before being able to cook some steam rice or even boil eggs.. LOL!!! At least that's the story  of most of the people i know in and around me and who i have come to meet over a period of time by sharing similar interests..  :)

I have baked cakes under my mother's supervision for Christmas & new year almost for the past couple of years.. But never seem to have registered the recipe or the technique that well. May be it was also, coz i wanted my family to know i baked a cake more than the registering all those key point she always told me.. you know the " mother's secret potion" into all that they end up preparing... ;)

I am a li'l superstitious about clicking pictures while preparing the desserts.. So...Sorry to disappoint but i dint quiet click pictures.. :P .. and ya before i could click the picture of the final outcome.. even the debris of the cake was missing... ;)

M not blowing my own trumpet!!! but its funny that for the first time after a series of flops in baking cakes at this new place by my mom, family & friends...my baking a cake for the 1st time and it turning out to be a cake was something i guess we all enjoyed and thus... u know... ;)

I plan to bake it yet again & next time its gonna be with icing.. so i shall put up the pics.. ;)

Going on to the recipe...

Ingredients:
  1. Eggs - 4
  2. Butter - 250 gms
  3. Maida / all purpose flour - 250 gms
  4. Sugar - 250 gms
  5. Baking Powder - 1 tsp
  6. Vanilla Essence - 8 drops
  7. Raisins/ Dried fruits - a handful
  8. Lime- 1
Procedure:

I am putting down the procedure in points as that how i think one should work around baking a cake! :)
  1. Add baking powder to the maida & sieve it together a couple of times.
  2. Grind the sugar and keep aside.
  3. Now, take the eggs and separate the yokes from the whites. Make sure the yoke does not break. In case it does just don't bother separating it. You can still get a beautiful cake..:) ( i simply feel baking a cake by separating the whites and yokes makes it a lot more softer..and thus like baking the tedious way.. ;)
  4. Beat up the egg whites separately and let it froth. Once its froths up, add some powdered sugar to check for the consistency of the white. The consistency should be such that there should be no water seeping out of the mixture. Now, beat up the yokes separately. Add a bit of lime to it (helps remove the odour! ). And beat it up.
  5. Take the bowl with butter, and dab a li'l butter into the baking bowl and spread evenly. Sprinkle some maida into the bowl and toss the same evenly such that the bowl is lined well with the flour.
Now beat the butter a li'l before adding the remaining sugar. Beat the two together. Make sure while beating the batter the movement should always be in one direction... either clock-wise or anti clock-wise..never both.. it creates air bubbles and ruins the batter!!! After beating the sugar & butter, add the beaten yokes to it. and beat it up!

Now start folding the batter with your hand by adding li'l maida spoons & egg whites. Its just folding all the way now and not vigorously mixing and beating them all... Once done add the vanilla essence and raisins and yet again fold the batter together.

Pour the batter into the lined bowl and using a pin..prick into the bowl randomly...

Place the bowl in a pre-heated oven, 180 degree for 45 mins.

You can also bake he cake in a cooker by placing the bowl directly into the cooker and keeping it on low flame for an hour. (This is how i went ahead!.. )

THE CAKE is ready!

Hope you njoi baking it as much as i did... ;)


P.S: Baking with the eggs not separated is also cool. All u gotta do is beat the sugar and butter together and later add the full eggs to the mix and beat well. Only later should you add the maida and fold the batter. Add the vanilla essence and lime at this point.. Your cake is still gonna turn out to be amazing.. :)

# 8: Chole Batura

Ummm.. Chole Bhatura!!!

Chole otherwise known as chick peas.. and one of the famous dishes from North India (Punjab).

My association with Punjab and North India goes back to the 80's & 90's. Oh! that does not make me to be in my late 40's or so.. Just that i was born in the Northern part of India. My early days and in fact most part of my schooling was in north India. I quiet enjoyed the transfers and shifting. I enjoyed the fact that dad was part of the Indian Army.

I must admit, its this association that gave me an opportunity to grow up in the multi-cultural,diverse, and colorful India that most people only end up speaking about or reading in books. Moving places every 2 years, meeting people from various walks of life, and the best of all...eating some yummy food that is special to them.

With Mommy being so passionate about cooking, and forever experimenting on food, we were always benefited out of the whole deal.

The other day, i was speaking to mom and i was telling her about my blog on food. I know she read it and liked the fact that i am finally cooking and enjoying it as much as she enjoyed cooking for us. It was then that she told me.. "its wonderful to cook & bake and experiment. The best is when u have people, even more kids to eat. :) "
I agree with mom! kids are honest and not fussy at all..if they love it they will love u for treating them so much... and if they don't like the taste..just look at the expression and know it all... :D ha ha ha..

Okay! coming to Chole Batura.... My palate is super excited with the thought of it! its a simple yet amazing dish. Chole is the thick chick pea gravy while Bhatura is a kind of deep fried "bread".


Coming to the recipe.. ;)

Chole:-

Ingredients:
  1. Kabuli Channa/ Chick Peas - 2 cups
  2. Onions - 2   (grated)
  3. Tomatoes- 2 (finely chopped)
  4. Green Chili - 2 (slit into halves)
  5. Coriander Leaves (finely chopped)
  6. Lemon
  7. Ginger garlic paste - 2 tsp/ 1 Tbsp
  8. Chole Masala- 3 Tsp
  9. Garam masala- 1 tsp
  10. Red Chili powder- 1 tsp
  11. Salt to taste
Procedure:

Soak the kabuli channa overnight. Now pressure cook the chole till 3-4 whistles. The chole need to be soft and such that we can mash with our fingers itself.

Now, in a hot oil pan...add the ginger garlic paste and onions. The grated onions need to turn brown. Add the green chillies & tomatoes. Make sure the tomatoes get mashed completely in the onions & ginger garlic. Add the chole masala and leave the mix to cook on slow flame. (if the flame is too high, it would get burnt rather than cooking well. You know the mix is coming together well when the aroma of the spices within the masala starts to spread around you...Trust me! its totally intoxicating.... :) )

Add the red chili powder and salt too. ( I prefer adding the salt once i put the chole in..but its absolutely fine if you wanna put in the salt now too.)

Add the chole to the mixture. Mash a bit too..(make sure you don't end up mashing all of it..Just with a spoon move over the chole and mash a bit...not aggressively please...)

In case the chole is turning out to be too dry, you can add some of the stock of the chole itself. And leave it to cook. Once the chole is cooked, add the garam masala and stir well... Just before serving add the chopped coriander leaves.

Batura :-

Ingredients:
  1. Maida/ All purpose flour
  2. Curd
  3. Water
  4. Salt to taste
Procedure:

Make a dough by mixing Maida, salt, Curd, & some water.  Kneed well such that the dough is soft.
Make small balls and using a rolling pin, roll the dough into oblong or round shaped rotis. Deep fry the rotis.

Serving:

The Chole is served with chopped onions over it and a piece of lime. Squeeze the lime on it for an even more mesmerizing experience! Relish it along with the Baturas.. :)


Soothe Ur senses!!!! :) :) :)


P.S:
I am sure many would like to add some more spices.. But i prefer keeping it a lot more simple and then playing around the spices as i advance.. u can add jeera powder, amchur powder, pepper etc... play around & share!!! ;)

# 7: Paneer!

Something is definitely different about this place. Apart from the beauty &  food.. What is also so different are some of the groceries that we pick up.. But what is a bit weird for me are the milk & eggs.. :D


The milk is either too fatty or absolutely not! the absolutely not is the one we pick up from the malls or so.. ;)
To our surprise for the first time in the 4 odd years have we made Paneer here.. :P It was just accidentally and eperimentally that we finally figured out that paneer can be made.. After 3 bottles of milk refusing to heat up and just constantly curdling up.. Mom decided! lets try if atleast Paneer can be formed with all this milk..

And Hurray! it did..squeezed a lime into it & here we were with some Paneer to relish.. Got quiet bored of eating Tofu!!! :P ;)

Now that, we had paneer, its just the regular Aloo-mattar-Paneer that comes to mind.. so here we went on to prepare Aloo-mattar -paneer!

In one of my earlier blog i mentioned aloo-mattar... i followed almost the same procedure..just that added square pieces of paneer tossed/fried in oil separately & added to the aloo-mattar gravy  at the end just before adding the garam masala... :)

http://telangs-grubhub.blogspot.com/2011/03/5-aloo-mattar-gravy.html

Njoi! :)

M back..

Aha! Its been quiet a while since i blogged. Not like i took a break from cooking or anything of that sort.. In fact i was busy preparing some grubs on a day to day basis but just got so engrossed in my self and my new found hobbies that could not find time to blog and share my li'l experiences.

Now, M Back!!! :) and so glad too..

During this li'l disconnect that i had from blogging, i went on to experiment with some local food round the corner.

Went to a place called "Little Oasis"..it serves some wonderful Japanese, Malaysian, & western delights.. Definitely, will soothe your palate. It did to mine at least! ;)

I took a western-oriental mix...Seafood delight!

It was stir fried noodles (not the traditional stir fired though! appeared more to me as if it was steamed and just put in a pan for a min..i was happy with the outcome.. ) served with crab meat, prawns, & a some fish pieces. Also, sprinkled over it was some oregano. It was yummy indeed! very simple but definitely a different taste.

Top it all, i made it a full meal.by adding mushroom cream soup, garlic bread, iced lemon tea, & finishing it well with a scoop of strawberry ice-creams. (the other flavors included: chocolate, vanilla, & mint)
I must admit...Mint is one flavor i now have taken a liking to.. (I know i dint order it..but a friend did..it was refreshing.... :) )

And, not so local but yet a delight to head for is "Nandos".

I have been to Nandos in India too, but honestly the taste is a lot more bland out there. It definitely doesn't go with the Indian taste buds. Something i was taken by surprise with. Considering even McD's and KFCs trying to suite the Indian palate.. Anyways! may be the marketing strategy would have been to provide the Indian customer something different from another country.. ;)

Nandos in Malaysia was a complete WOW!

I ordered for an "Angry Mango burger" with my all time favs Ice lemon tea...one should definitely visit Nandos..  http://www.nandos.com.my/

I am yet to indulge in some more local cuisines..I am sure its gonna be a lot of fun.. :) 

Thus, My journey continues....

Ciao,
Appu :)

Monday 14 March 2011

P.S : In Process of Discovering a New Side to ME

P.S :

May be the dishes, i prepare and post on this blog, ain't all that different. And i know many people know the recipes.. I am not here to promote my recipes but catalog them and share my journey of 180 days and the 300 odd recipes i plan to make. And to pen down the experiences and thoughts that go by my mind... For some amateurs like me, it might be useful..

All, i intend is that while you read my journey..u also get to know what and how i did it. Thus, the recipe. I would be glad to hear and get some of your recipes and possibly comments on how can i better my own. It'll be fun to tread this path with a lot of company. Fun & Frolic is a must in everything we do. Else life is too drab!

I am in process to discover a new side of me and my life...  

So long...

# 6: Baigan Ka Bartha

"Brinjal? Are you kidding me??? I am allergic! Moreover it does not contain any nutrient value!!!! "
That's the most silliest excuse i had given to not eat Brinjal in any form.


Well, as a child I have not been fussy about food. It just had to be edible. With time the factor of the food's appreance started to be another factor i considered before serving it on my plate. But then, i am the younger one. I always wondered why my elder sibling was excused from eating veggies while i was not. Mom's pet dialogue used to be, " you better eat it, even if its gonna take you the whole day baby!". Can you imagine that? Phew!   I always hoped to be the favored one as i was younger... }:)
Guess what, with brinjal!!!! I managed to excuse myself with an emotional out burst of ," Mom its the only vegetable i dont like. And I am allergic na?!!! Please pardon me on this one...PLeaseeeeeeeeee"..&..  It worked ;) I guess somewhere she got tired of my non-sense and gave up too.


Its not a dish i enjoyed. It must have been somewhere in Oct 2009 when i ate Baigan ka bartha cooked the smoked out way (sent to me by a friend as i was not well) and to my surprise.. I quiet relished it. Since then the taste just lingers on and i just do not seem to get over it.


Anyways, coming back to the topic of discussion.. Brinjal and the most famous dish or recalled dish .."Baigan ka bartha".


Opened the fridge & found 2 nice big brinjals. Decided to experiment and see if i can get the same taste that i once had. All i knew was that the brinjals have to be smoked and not boiled. So here's my experience...


Ingredients:
  1. Brinjals - 2
  2. Onions - 1 (finely sliced)
  3. Tomato - 1 (chopped)
  4. Gree chillis - 2 (cut into halves)
  5. Ginger garlic paste- 1 tsp
  6. Jeera powder - 1/2 tsp
  7. Turmeric powder - 1/4 tsp  (just a pinch)
  8. Red chilli powder - 1/2 tsp
  9. Garam Masala - 1 tsp
  10. Salt (to taste)
  11. Oil - 3 tsp
Procedure:


Smoke the brinjals out by directly placing it on the flame and wait untill the skin starts to turn black or seem to peel off. Once smoked, peel off the burnt skin and mash the brinjals. It should not contain lumps.


Add ginger garlic paste to the hot oil pan. Later add the onions and fry till golden brown. Add the chopped tomatoes and green chillis. Leave to cook for a while till the tomatoes are cooked. Now add the mashed brinjals.Leave to cook for a while before adding in the spices. Now add the salt, red chilli powder, turmeric, garam masala, and jeera powder.  Add leave to cook.


Stir at regular intervals else might get burnt coz of the ginger garlic!


Baigan Ka bartha Taiyaar!!!!.. ;)


The taste i was longing for... somewhere i guess i'l have to work around it a lil more. Probably see what different spices do to it. But, what i liked the most today was my family's praise for the dish. Mom was impressed! and she had the raised eye brow with a smile on her face... the typical mom's " Not bad" expression... :P I am glad they loved what i cooked..although i am still yet to get better..We enjoyed our meal. :)


What amazed me while preparing this dish is the level of patience i had developed.Waiting for the brinjals to get smoked properly, tossing them time and again, making sure they are peeled off well, and also while mashing no lumps should be there. While the sight of seeing the natural brinjal's oil all over the bowl..was a delight!


A sense of happiness to do something unlike my usual self!

Ciao :) 


Sunday 13 March 2011

# 5: Aloo-Mattar Gravy

:-D                                      Right now i have the biggest smile on my face!!! 

The reason being, My friends know me to be one person they have known who is so madly in love with potatoes that i can possibly eat various dishes of potatoes for all 3 meals...and not to forget snack on them as well!!! ;)

Well, that's true to the extent that i do love potatoes..They are the easiest to cook and get done with..and also pretty appetizing! ;) Anyways, it been over a year I stopped my potato glutton and shed a few pounds too.. :) "blush"

Getting back to the recipe... Aloo mattar gravy is one recipe i saw a family friend make and found it yummy! (considering i loved only potato fry..and any another form of potato given to me would instantly find a "not so appetizing" look on my face! )


 Ingredients:
  1. Potatoes - 2 to 3
  2. Peas - 1.5 Cups
  3. Onions - 1 (Chopped)
  4. Tomatoes - 3 (chopped)
  5. Green Chilli - 1 (Slit into half)
  6. Coriander leaves- ( a handful, chopped & for garnishing )
  7. Ginger Garlic paste - 1 Tsp
  8. Garam masala powder- 1 tsp
  9. Amchur Powder - 1 tsp
  10. Red Chilli Powder - 1.5 tsp
  11. Turmeric powder - 1/2 tsp
  12. Jeera powder - 1/2 tsp
  13. Salt  ( to taste)
  14. Oil
Procedure:

Grind the tomatoes, onions, & green chilli together in to a puree. Now add oil in a bowl and add the ginger garlic paste. Fry for a while. Now add the puree to the ginger garlic paste and let it cook for a while. Add potatoes (in case they are not boiled, so that it can cook along with the puree). Cook the 2 together till the raw taste does not disappear.Add salt as well.
 
Now add the peas. After a while add red chilli powder, turmeric powder, & jeera powder. Let them all cook. Later, add the amchur powder and garam masala and mix well. You can let the gravy thicken by cooking it a little longer or leave it as is.

Garnish with finely chopped coriander leaves!

Ta da!!!

# 4: Mixed Vegetable Cutlet

Mixed Vegetable cutlet!

Ingredients:
  1. Potatoes - 3 to 4 (boiled )
  2. Onions - 1 (finely chopped bits)
  3. Cabbage - 3- 4 leaves ( grated or finely chopped)
  4. Peas - 1 cup
  5. Corriander leaves - 4 to 5 stems (finely chopped)
  6. Green Chillis - 2 ( cut into rings)
  7. Ginger-garlic paste- 1 Tsp
  8. Garam Masala - 3/4 Tsp (level)
  9. Salt ( to taste)
  10. Rice Flour or Rava
Procedure:

Mash the potatoes. Add the grated cabbage, peas, green chillis. Mix well. Before adding the onions, fry the onions a bit till golden brown in a pan and then add to the mixture. Now add the ginger garlic paste, garam masala, corriander leaves, and salt. Mix well. Make sure the mixture is not too wet else the cutlets wont get formed.

Now, make medium size oval cutlets and toss them in a plate containing Rava or rice powder. This will add the required crispyness and also make sure the cutlets does not fall apart.

Take a pan, add 1 tsp of oil and put the cutlets into the hot pan of oil.
In a while, cutlets are ready!!!! :) ( Make sure the flame is not too high nor too low... ;) )

Hurray!

# 3 : Matar Pulao

Rice!!! The thought of eating steamed rice instantly resigns me into my nut shell. Low and bored!
I guess, despite knowing how healthy steamed food is, I always have an affinity for fried food. Not just me..I am sure many would agree with me on this point. I think its perfectly normal..considering the food instantly tastes different when cooked in oil.


Honestly, both steamed food and fried food have their own tastes and aromas. And they are all magnificent!


Anyway.. its Sunday. ;)


Wow! Sundays are always the yummiest days for me. Well weekdays are yummy too, but then Sunday is better than all the days. Even as a child,Sundays were always special. Something new all the time! Different cuisines, learning to eat with spoon-fork-knife,..i think i just simply enjoyed my Sundays to the fullest!


Okay! here was my plan for the Sunday... Matar Pulao, Cutlets, & Aloo-mattar gravy.

Mattar Pulao!!!

Ingredients:
  1. Peas - 1.5 Cup
  2. Onions- 1 (finely sliced)
  3. Tej Patha - 2 ( washed and broken)
  4. Cloves - 8 to 10
  5. Pepper - 4 to 5
  6. Rice -  2 Cups
  7. Ghee - 1 Tbsp
  8. Green Chilli - 2 (Slit into two halves )
  9. Salt (to taste)
Procedure:

Take a cooker. Add ghee.Once the ghee is hot, add the onions. Fry till golden brown. Add the cloves, tej patha, pepper, & green chilli. Stir a while. Now add the rice. Stir the rice for 5 mins on low flame. Now add the peas in to the cooker and mix well and keep for a min. Later, add 1 tsp of salt ( or as per taste) and 4 cups of water.

2 whistles and the rice is ready!!! :)

Variation:
  1. More spices can be added. Such as cinnamon, badi elachi etc.
  2. To add color to the rice, either turmeric powder or saffron can be added. ( I strongly do not believe in adding artificial colors... They are hazardous! )
  3. To add a different flavor to the simple Pulao, add pav bhaji masala... ;)

Bon Appetite!

Saturday 12 March 2011

# 2: Scrambled Egg

Scrambled eggs aka egg burji ( as written on most of the indian canteens/mess)!!! I have fond memories of this dish. There have been days when all three meals a day have been ~~ scrambled eggs served with parathas or toasted bread or just pulkas ( roti's without oil).  Its also one of the first dishes i learnt seeing mom, and that i must admit (without boasting) was in school!

Scrambled eggs can be made in various fashions, depending on the likes of a person and the time of the day he is planning to eat it. For breakfast, some would like like scrambled egg whites served with toasted bread-butter and a glass of fruit juice or tea or milkshake. For a brunch, it may turn out to be something more filing by adding onions, veggies, cheese etc. and served with paratha (oiled rotis).  It ideally just takes10 mins to prepare.


Just yesterday... We were in hurry and with weekend around the corner and groceries yet to be bought...Eggs are always a saving grace! ;)

So here's my variation to the regular scrambled eggs i prepare. Considering years of practice! ;)

Ingredients:

  1. Eggs - 2
  2. Onions -1 (finely chopped)
  3. Tomatoes -2 (finely chopped)
  4. Corriander leaves - a few ( 3-4 stems) (finely chopped)
  5. Green Chill - 1 or 2
  6. Pepper- 1 Tsp
  7. Milk
Procedure:

Beat the eggs in a bowl. Add 1 Tbsp of milk to it and beat the eggs again. 
Add the onions into a hot pan with 1 tbsp of oil. Fry the onions on low-medium flame untill gloden brown. Add tomatoes into the pan. Leave the tomatoes and onions to cook. Add salt as per taste. Also, add in the finely chopped green chillis (circular rings). 

Once the tomatoes and onions cook, add the beaten egg, corriander leaves, pepper, and 2 TBsp of milk into the pan. Stir a little and cover with a lid for the egg to cook and bloat up. Later, stir the mixture well.

Scrambled eggs are ready to be served!!! :)

Njoi!

PS: Serves 3 ppl. Serve the eggs with toasted bread butter or parathas with a glass of juice or milkshake.

Variations:

1. Beat the eggs with salt and red chilli powder only and fry it in a pan. Stir well. ( with yoke or even with out egg yoke)
2. Add grated cheese to the scrambled egg at the end just before serving.
3. Add capsicum and other veggies of your choice to make it more filling.

Keep innovating! 
& hey! do let me know too............... ;)
    

Friday 11 March 2011

#1 : Caramel Custard


Baked custard! “Creme Caramel. A light egg custard that is baked in caramel-lined mould in a water bath. After the custard is baked, it is chilled and then turned out of the mould.. In Spain, it is called flan and in Italy, crème caramella.” ~ The international dictionary of desserts, pastries, & confections, Carole Bloom [Hearst books: new York] 1995 (P.84)

My early memories of caramel custard, was of someting like flubber when touched. An off white base with a dark top. While sweet to taste the bitterness of the burnt sugar taking over the palate..not something i quiet relished as a kid.  Over the years, I have begun to like this dessert. And thus it happens to be the first recipe I have cooked.

(Burn the sugar a li'l longer for a dark caramel!
Else have a lighter version to it... both give amazing flavors...)
The Recipe is as follows:

Ingredients:
  1. Milk- 350 ml
  2. Sugar - 3 TBsp
  3. Eggs - 2
  4. Vanilla Essence 
Procedure:

Beat up 2 Tbsp of sugar and eggs together. Add the milk to the sugar-egg mix and beat up the mixture. Now add the essence and mix well. ( The essence apart from adding flavor to the custard will also remove the smell of egg.) An improvisation to the custard can be done by adding grated orange/lemon peels. Mix the batter well.

Take an aluminium vessel or  a preferred bowl of your choice and add the balance 1 Tbsp of sugar to it. Heat the sugar to prepare the caramel. Once the caramel is ready, keep it aside till it cools down.

Now, add the beaten mixture into the caramel bowl. Cover the bowl with butter paper. Place the bowl in a cooker containing appropriate amount of water (prefereably 2 glasses).  Leave to steam for 15 mins.

Once the caramel custard cools down, turn the custard over into a plate. Refridgerate for a while. 

Delicious Caramel Custard is ready to be served!!! 

Njoi! 


Grub Hub: The Introduction

"Cooking is like love, you do it well, or do not do it all. " ~Harriet van Horne

"The qualities of an exceptional cook are akin to those of a successful tightrope walker: an abiding passion for the task, courage to go out on a limb and an impeccable sense of balance." 

I was ramdomly searching for some phrases and quotes, when i stumbled upon the above two quotes so wonderful and beautiful in themselves. And honestly, quiet TRUE.

Food Connect: Telang's Grub Hub is an inspirational journey! A journey of learning, cooking, baking and penning down the 300+ recipes in the 180 days... I am excited, while i am nervous too. I aint sure about the end result, but am looking forward to this overwhleming experience.

Movies and reality show do make an impact on a person's life. So did many movies, such as : Julia & Julie, Ratatouille, Masterchef Australia, Chew make an impact on me.

" Cooking my way through my Ma's cook book" was a blog i recently wrote on my blog : " Memoirs"

My mother's an exceptional cook. I have grown up seeing her make some exceptionally wonderful delicacies. Be it for meals or snacks. Be it cakes, pasteries, puddings, cookies, or biryani, parathas, noodles, pizza...I do not quiet remember going out and feasting ever. Not untill we left home for studies and lived the hostel life with mess food. :-|

The extra bonanza feasting all happened at home..with yummy home made grub.

I dedicate this blog and all the up coming recipes to my wonderful mom, for the patience and love with which she cooked for us all the time..and still going strong!

Love u mamma :*