Wednesday, 27 April 2011
Monday, 25 April 2011
# 31: Cold Cake
It was in 1989-90, Dad was transferred to Pathankot. A place that i hold close to my heart. :) I was very small then. Sundays,then, were the best days for me i guess.. After all, i could sleep for long hours carefree of rushing to school. (Let me tell u..i loved going to school...but also loved and still love my sleep!) ...Mom used to give us the leverage to wake up at least by 9:30-10.. But its never enough for me you see.. and i loved stretching the time... I used to wake up only to the sounds of Cartoon serials starting up or the smell of food or bollywood music "Chitrahaar" on Doordarshan!.. Makes me feel like Jerry the mouse! lol.. :D
But Honestly, i can still remember.. the moment i have to be woken up..all my brother did was tell me 'Jungle book' or 'potli baba ki' was starting..If i was sleeping in Mom-dad's room, i would be tucked in my duvet and trying to take a sneak peek at the TV to check on the authenticity of my brother's statements.. But aah ha! he is after all my brother.. ;)
Anyways...I can just go on and on about Pathankot and places i love...and would love to go back to.
It was in Pathankot that although we did not have cable TV/Dish TV.. there was a weird but interesting cross connection..due to which we used to manage to get PTV (Pakistan TV). I must admit..it was a brilliant channel! For me PTV was about getting to watch the Pink Panther cartoon series! while for mom.. it was about the wonderful Pakistani recipes.. (I still wonder how nicer it would have been if we dint have the stupid Partition.. Grrr! Power and Politics cause only misery!!!! )
Mom has learnt some wonderful recipes from that channel..and always praises it.' Pudhina Briyani, Kebabs, non-veg dishes, and desserts'..are just a few ..but the list is endless.. ummmm!!! I some how have an elephant's memory and if that was not enough..my love for food has gone to extents with lingering tastes for some exceptionally yummy preparations.
Past couple of months i have been trying to remind mom of that one particular dessert she made at Pathankot.. But somehow, i could not remember the name. All i do remember is its taste and that she took it out from the freezer and cut it into circular portions ..like Swiss roll!
With Lent coming to an end and Easter preparations on.. i so wanted to have that same dish i spoke to mom about..which somehow even she could not remember what i was referring too.. :(
While deciding the menu for Easter Sunday with my family, i just happened to mention the description to my brother..(not like i was very hopeful that he would remember!).. But I was delighted for once with my brother's food memory.. ha ha ha..
He says," Oh you talking about the COLD CAKE, the Pakistani recipe na! " ... & I went, "Hurray" all over the house..
Honestly, In desserts..The taste of Cold Cake has lingered on with me for more than 20 yrs.. And now that we all recollected the dessert..it so had to be part of our Easter Special Menu! :)
After feasting on some yummy lunch..we had to have a grand closure with this delectable dessert!


 Ummmm....
I look forward to festivals.. be it Christmas, Easter, or Diwali.. not just for the meanings they hold..but since its that time of the year when the family comes together....
This Easter was special..not just coz the whole family was together but coz it was my 10 month old darling niece's first Easter! :) Not like she can binge on all the food but at least having her around is just wonderful! Even more is the way she loves eating the food we eat and wanting us to make her taste everything! but lemme tell u..she is choosy! (I somehow fail to understand how she knows what's best to have! )
My most happiest moment yesterday was...."Trisha's never ending quest to bite into the cold cake", & " dad's smile and request for 'i want another helping please..(despite being diabetic! and his constant wow(s)! which i am hearing for the first time )' .. and everyone really having a great time with a "My tummy soooooo loves feasts... "


But Honestly, i can still remember.. the moment i have to be woken up..all my brother did was tell me 'Jungle book' or 'potli baba ki' was starting..If i was sleeping in Mom-dad's room, i would be tucked in my duvet and trying to take a sneak peek at the TV to check on the authenticity of my brother's statements.. But aah ha! he is after all my brother.. ;)
Anyways...I can just go on and on about Pathankot and places i love...and would love to go back to.
It was in Pathankot that although we did not have cable TV/Dish TV.. there was a weird but interesting cross connection..due to which we used to manage to get PTV (Pakistan TV). I must admit..it was a brilliant channel! For me PTV was about getting to watch the Pink Panther cartoon series! while for mom.. it was about the wonderful Pakistani recipes.. (I still wonder how nicer it would have been if we dint have the stupid Partition.. Grrr! Power and Politics cause only misery!!!! )
Mom has learnt some wonderful recipes from that channel..and always praises it.' Pudhina Briyani, Kebabs, non-veg dishes, and desserts'..are just a few ..but the list is endless.. ummmm!!! I some how have an elephant's memory and if that was not enough..my love for food has gone to extents with lingering tastes for some exceptionally yummy preparations.
Past couple of months i have been trying to remind mom of that one particular dessert she made at Pathankot.. But somehow, i could not remember the name. All i do remember is its taste and that she took it out from the freezer and cut it into circular portions ..like Swiss roll!
With Lent coming to an end and Easter preparations on.. i so wanted to have that same dish i spoke to mom about..which somehow even she could not remember what i was referring too.. :(
While deciding the menu for Easter Sunday with my family, i just happened to mention the description to my brother..(not like i was very hopeful that he would remember!).. But I was delighted for once with my brother's food memory.. ha ha ha..
He says," Oh you talking about the COLD CAKE, the Pakistani recipe na! " ... & I went, "Hurray" all over the house..
Honestly, In desserts..The taste of Cold Cake has lingered on with me for more than 20 yrs.. And now that we all recollected the dessert..it so had to be part of our Easter Special Menu! :)
After feasting on some yummy lunch..we had to have a grand closure with this delectable dessert!
COLD CAKE

Ingredients:
- Marie Biscuits - 1 Packet
- Butter - 3/4 Cup (100 gms)
- Sugar - 10 Tbsp ( I know, it seems a lot..but take levelled spoons like i did.. else the cake would be bitter!)
- Coco powder - 3 Tbsp
- Nuts (almonds, hazel nut, cashews, ground nuts) -cut into small pcs
- Eggs -2
* Item for setting: Plastic bag.
Preparation:
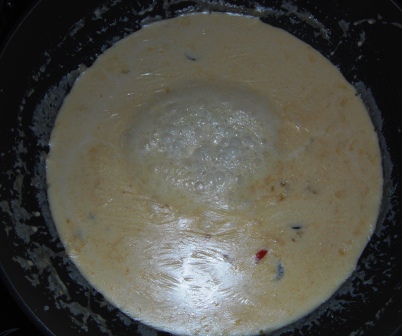
Beat the eggs in a bowl.
Heat a pan of water. To the bowl of beaten eggs, add butter, sugar, & coco powder. Whisk the mixture well till it gets thick. When thick, take it off the flame and let it cool.
Break the biscuits into small pieces and crush the nuts. Add the biscuits and nuts to the Coco mix. Mix it well.

Pour the mix into the bottom of the plastic bag. Roll the plastic bag and freeze it for a minimum 3 hrs.
Once frozen. Cut open the plastic bag and cut circular disks of the cake....

Serve as is or even with Vanilla ice cream!
 Ummmm....
I look forward to festivals.. be it Christmas, Easter, or Diwali.. not just for the meanings they hold..but since its that time of the year when the family comes together....
This Easter was special..not just coz the whole family was together but coz it was my 10 month old darling niece's first Easter! :) Not like she can binge on all the food but at least having her around is just wonderful! Even more is the way she loves eating the food we eat and wanting us to make her taste everything! but lemme tell u..she is choosy! (I somehow fail to understand how she knows what's best to have! )
My most happiest moment yesterday was...."Trisha's never ending quest to bite into the cold cake", & " dad's smile and request for 'i want another helping please..(despite being diabetic! and his constant wow(s)! which i am hearing for the first time )' .. and everyone really having a great time with a "My tummy soooooo loves feasts... "


# 30 : Pineapple Upside Down Cake
Easter..Easter...Easter...
Be it Christmas or Easter.. After the midnight service.. we celebrate new beginnings! And Easter always brings new beginnings for us... Each year is so different..so wonderful.. so memorable!
Had to have something different..something new and exciting! I guess baking cakes is not difficult..there's a set of ingredients..get the hang of it and you know how to do it. Creating variations can be so much fun!
In search of something new and different and something that's new to mommy.. I picked out "The pineapple upside down cake" by Nigella Lawson.. (i know i know..u must be wondering how i adore her recipes..but trust me.. its addictive...and even u will fall into it! )
Preparing Indian cuisines is something that we do all the time.. But preparing various cuisines from around the world is what i love!
So here it was..my "Pineapple Upside Down Cake"...

Ingredients:
Grease the tin with butter and sprinkle 2 Tbsp of sugar on top of the butter base.


Beat the flour, baking powder, soda, butter, caster sugar, & egg till the batter is smooth. Add 3 Tbsp of the pineapple juice and mix well.

Pour the mix into the tin.
Since i baked the cake in a cooker. So i did not pre heat it before pouring in the batter nor did i follow the time of 30 minutes for baking. Rather, I poured in the batter making sure the slices and cherries don't move and kept the cake to bake for 1 hr on absolutely slow flame!
(Ideally, you need to pre-heat the oven @ 200degree Celsius. And bake the cake for just 30 minutes! )
After 1 Hr, pierce through the cake and make sure nothing is stuck to the needle.. and you know the cake is ready!.. Let it cool down and only then gently toss the cake upside down into a plate..
If you think the cake is stuck to the sides and has not come off by itself after cooling..then gently using a spatula.. separate it from the tin and the turn it upside down!

Toasting to good health, success, and renewed happiness...

Be it Christmas or Easter.. After the midnight service.. we celebrate new beginnings! And Easter always brings new beginnings for us... Each year is so different..so wonderful.. so memorable!
Had to have something different..something new and exciting! I guess baking cakes is not difficult..there's a set of ingredients..get the hang of it and you know how to do it. Creating variations can be so much fun!
In search of something new and different and something that's new to mommy.. I picked out "The pineapple upside down cake" by Nigella Lawson.. (i know i know..u must be wondering how i adore her recipes..but trust me.. its addictive...and even u will fall into it! )
Preparing Indian cuisines is something that we do all the time.. But preparing various cuisines from around the world is what i love!
So here it was..my "Pineapple Upside Down Cake"...

Ingredients:
- Butter for Greasing
- Sugar - 2 Tbsp
- Pineapple - 4 slices (depending upon the size of the tin )
- Glazed Cherries - 11
- Flour - 100 gms
- Baking Powder - 1 Tsp
- Bicarbonate soda - 1/4 Tsp
- Soft Butter - 100 gms
- Caster sugar - 100 gms
- Eggs - 2
- Pineapple juice/syrup - 3 Tbsp
Grease the tin with butter and sprinkle 2 Tbsp of sugar on top of the butter base.

Arrange the pineapple and cherries.

Beat the flour, baking powder, soda, butter, caster sugar, & egg till the batter is smooth. Add 3 Tbsp of the pineapple juice and mix well.

Pour the mix into the tin.
Since i baked the cake in a cooker. So i did not pre heat it before pouring in the batter nor did i follow the time of 30 minutes for baking. Rather, I poured in the batter making sure the slices and cherries don't move and kept the cake to bake for 1 hr on absolutely slow flame!
(Ideally, you need to pre-heat the oven @ 200degree Celsius. And bake the cake for just 30 minutes! )
After 1 Hr, pierce through the cake and make sure nothing is stuck to the needle.. and you know the cake is ready!.. Let it cool down and only then gently toss the cake upside down into a plate..
If you think the cake is stuck to the sides and has not come off by itself after cooling..then gently using a spatula.. separate it from the tin and the turn it upside down!

Toasting to good health, success, and renewed happiness...

HAPPY EASTER!
# 29: Pan Cakes
Good Morning.. and wishing you all a very Happy EASTER!!!! :) :) :)
After the pascal vigil, it was next to impossible to even expect me to wake up and do anything.. But then i had promised everyone to take over the kitchen..could not have let myself & them down.. On a regular day, i don't quiet remember when have i had breakfast.. But i made Easter Sunday an exception.. Not just did i wake up for breakfast but also prepared it with all the excitement and thrill of trying something new!
Few weeks back, i was as usual on my favorite chef's website! "Nigella Lawson". When it comes to waking up late and yet wanting a luxurious quick breakfast.. i cant think of anyone but Nigella & so"Pan cakes" was what i picked.
I woke up around 9AM (honestly, its way too early for me.. :D ;) ) and so did everyone else at home (it really got late by the time we crashed to bed the other nite...)!
Picked up my ingredients and was all set for Mission Pan Cakes! lol...afterall, its the first time i was preparing it and top it all..the first time most of my family members were gonna have pan cakes! :D
Ingredients:
Separate the egg yoke and white. Beat them separately.
Melt the cheese a bit, and add milk to it. Beat the two together. Add the egg white and beat it for a while before you add in the yoke as well. Beat the mixture.
Mix the baking powder along with the flour and add the two to the cheese-milk-egg mix. Beat well and the batter is ready.
Take a non-stick pan, and pour a scoop of the batter on it. It spreads on its own..so i did not have to get worked up about the shape. Leave for a while and then turn them over. A minute or two and the pan cakes are ready!
Serve with honey streaks & garnish with Strawberries! Also, team it with strawberry jam or any jam of your choice... :)

After the pascal vigil, it was next to impossible to even expect me to wake up and do anything.. But then i had promised everyone to take over the kitchen..could not have let myself & them down.. On a regular day, i don't quiet remember when have i had breakfast.. But i made Easter Sunday an exception.. Not just did i wake up for breakfast but also prepared it with all the excitement and thrill of trying something new!
Few weeks back, i was as usual on my favorite chef's website! "Nigella Lawson". When it comes to waking up late and yet wanting a luxurious quick breakfast.. i cant think of anyone but Nigella & so"Pan cakes" was what i picked.
I woke up around 9AM (honestly, its way too early for me.. :D ;) ) and so did everyone else at home (it really got late by the time we crashed to bed the other nite...)!
Picked up my ingredients and was all set for Mission Pan Cakes! lol...afterall, its the first time i was preparing it and top it all..the first time most of my family members were gonna have pan cakes! :D
Ingredients:
- Cheese - 6 to 7 slices
- Milk - 225 ml
- Eggs - 2
- Flour - 150 gms
- Baking Powder - 1 tsp
- Strawberries.. for garnishing!
- Ricotta Cheese - 250 gms
- Milk - 125 ml
- Eggs -2
- Flour - 100 gms
- Baking Powder - 1 Tsp
Separate the egg yoke and white. Beat them separately.
Melt the cheese a bit, and add milk to it. Beat the two together. Add the egg white and beat it for a while before you add in the yoke as well. Beat the mixture.
Mix the baking powder along with the flour and add the two to the cheese-milk-egg mix. Beat well and the batter is ready.
Take a non-stick pan, and pour a scoop of the batter on it. It spreads on its own..so i did not have to get worked up about the shape. Leave for a while and then turn them over. A minute or two and the pan cakes are ready!
Serve with honey streaks & garnish with Strawberries! Also, team it with strawberry jam or any jam of your choice... :)

Ola! My pan cakes were ready in just a matter of 30 minutes..in all by 10 AM..everyone was done with Breakfast! and am glad there were no left overs! ;) so i assume it did suite the taste buds... :P
Sigh! (What a relief..)
# 28: Roast Chicken
Easter was round the corner and deciding the menu was chaotic yet fun! With 2 vegetarians and 5 non-vegetarians..u know what i mean!!! ;)
I love chicken! but ya.. its not like i can eat it every single day. I guess, i am like this since mom never made it an habit. Festivals, Bdays, and weekends are the only days when we have a non-veg feast! Mom knew how to keep the excitement in us! :)
Easter Sunday lunch had to be simple, quick, & yet grand.. Coz after the pascal vigil on holy Saturday..waking up in the morning might not be all that easy. And especially for me.. its a complete pain! and this time i decided that i want to prepare everything all by myself.. ha ha ha (I don't know what i was thinking when i decided to dawn the chef's cap for the day! ;).. )
Roasting the chicken does not require one to marinate it well in advance..and that i guess was a blessing. Its just about leaving the chicken to cook all by itself with the spices.Its the simplest.. and so definitely had to be part of this year's Easter Sunday special!
Ingredients:
Preparation:
Heat a pan of oil and toss in the finely cut onions. Let the onions turn a bit golden and then add the ginger garlic paste. Let the two cook for a while (approx 1 min). Add the spices ( cloves, cardamom, & cinnamon). Cover the pan & let it cook on slow flame. Once you sense the aroma of the spices, add the chicken pieces.
 Ideally, you can add the potato slices. But i did not. Rather i had boiled the potato slices and then pan fired them a bit before adding to the dish! Dint want the potatoes to get burnt in the bargain of roasting the chicken!
Okay, while i added the chicken a lil bit of the chicken stock (say 3 tsp) was also added.. Did this so that the chicken does not get burnt and rather cooks well. Cover this chicken with a lid and leave it to cook by itself! Do make sure you keep tossing the pieces at regular intervals..
Eventually, the stock gets dried up and the chicken starts to get the caramelizing effect!
Toss the pieces over and make sure its caramelized well. Before taking it off the flame, add the potatoes and mix it well.
Ta da... we are done! :)
I love chicken! but ya.. its not like i can eat it every single day. I guess, i am like this since mom never made it an habit. Festivals, Bdays, and weekends are the only days when we have a non-veg feast! Mom knew how to keep the excitement in us! :)
Easter Sunday lunch had to be simple, quick, & yet grand.. Coz after the pascal vigil on holy Saturday..waking up in the morning might not be all that easy. And especially for me.. its a complete pain! and this time i decided that i want to prepare everything all by myself.. ha ha ha (I don't know what i was thinking when i decided to dawn the chef's cap for the day! ;).. )
Roasting the chicken does not require one to marinate it well in advance..and that i guess was a blessing. Its just about leaving the chicken to cook all by itself with the spices.Its the simplest.. and so definitely had to be part of this year's Easter Sunday special!
Ingredients:
- Chicken pieces - 8
- Onions - 1 (finely cut)
- Potato - 1 (cut into circular portions) Optional!
- Ginger Garlic Paste - 1 Tsp
- Cinnamon sticks- 2 (broken into halves)
- Cloves - 3
- Cardamom [Elaichi (whole)] - 1 ( crushed a bit)
- Pepper - 1 tsp
- Salt- 1 tsp
- Oil - 2 Tsp
Preparation:
Heat a pan of oil and toss in the finely cut onions. Let the onions turn a bit golden and then add the ginger garlic paste. Let the two cook for a while (approx 1 min). Add the spices ( cloves, cardamom, & cinnamon). Cover the pan & let it cook on slow flame. Once you sense the aroma of the spices, add the chicken pieces.

Okay, while i added the chicken a lil bit of the chicken stock (say 3 tsp) was also added.. Did this so that the chicken does not get burnt and rather cooks well. Cover this chicken with a lid and leave it to cook by itself! Do make sure you keep tossing the pieces at regular intervals..
Eventually, the stock gets dried up and the chicken starts to get the caramelizing effect!
Toss the pieces over and make sure its caramelized well. Before taking it off the flame, add the potatoes and mix it well.
Ta da... we are done! :)

Thursday, 7 April 2011
# 27: Eggplant Delight
A try at Reverse Engineering a recipe! and a bit of an experiment too...did not know the name of this dish...and thus, named it - "Eggplant Delight"
Some time back, i was invited over for dinner where i had a certain dish of eggplant which was mouth watering and simply amazing. When i enquired about how this certain dish was prepared, i was told its very simple! just use sesame and besan (chickpea flour). Rest was left to my imagination. (Sigh!)
After a long time, with no recipe in hand but just a wild idea about the main ingredients, i decided to go ahead, experiment, and cook. Well, honestly, the taste is no where close to what i had...But its certainly much different and a recipe in itself now. I'd like to pen it down..
Ingredients:
Roast the Sesame seeds in a pan and mix it with the besan. In the meanwhile, heat the 1.5 tbsp of oil and add the onion paste. Let the onions fry in the oil. Later add the ginger garlic paste. Leave the two to fry for 2-3 mins. Add in the red chili powder, turmeric powder, and cumin powder. Mix them well. Now add in the sesame seeds and besan. Mix all of them and let it cook a while. Add a pinch of salt as well. Cover with a lid and occasionally do keep mixing the gravy. This will take approximately 7 mins to cook and be ready.
Remove the gravy from the pan and keep aside.
Now, heat the remaining oil in the pan and add the eggplant and 1 tsp of salt. Cover it with a lid. Let the eggplant soften up. Once it has softened up, add the sesame-besan gravy. Mix it well and leave to cook. Add salt to taste and do stir occasionally. In about 8-10 mins the vegetable is ready. Now add the garam masala and mix well. Leave to cook for another 2 mins and the dish is ready (in good 20 minutes)!
Garnish with coriander.

Some time back, i was invited over for dinner where i had a certain dish of eggplant which was mouth watering and simply amazing. When i enquired about how this certain dish was prepared, i was told its very simple! just use sesame and besan (chickpea flour). Rest was left to my imagination. (Sigh!)
After a long time, with no recipe in hand but just a wild idea about the main ingredients, i decided to go ahead, experiment, and cook. Well, honestly, the taste is no where close to what i had...But its certainly much different and a recipe in itself now. I'd like to pen it down..
Ingredients:
- Eggplant - 3 (cut into pieces)
- Sesame seeds (white)- 1.5 cups
- Chickpea flour (Besan) - 1 cup
- Onion - 1 ( cut and ground into a paste)
- Ginger garlic paste - 1 tsp
- Cumin powder - 1.5 tsp
- Red chili powder- 2 tsp
- Turmeric powder - 1/2 tsp
- Garam Masala powder - 1 tsp
- Coriander Leaves (for garnishing)
- Salt to taste
- Oil - 3 Tbsp
Roast the Sesame seeds in a pan and mix it with the besan. In the meanwhile, heat the 1.5 tbsp of oil and add the onion paste. Let the onions fry in the oil. Later add the ginger garlic paste. Leave the two to fry for 2-3 mins. Add in the red chili powder, turmeric powder, and cumin powder. Mix them well. Now add in the sesame seeds and besan. Mix all of them and let it cook a while. Add a pinch of salt as well. Cover with a lid and occasionally do keep mixing the gravy. This will take approximately 7 mins to cook and be ready.
Remove the gravy from the pan and keep aside.
Now, heat the remaining oil in the pan and add the eggplant and 1 tsp of salt. Cover it with a lid. Let the eggplant soften up. Once it has softened up, add the sesame-besan gravy. Mix it well and leave to cook. Add salt to taste and do stir occasionally. In about 8-10 mins the vegetable is ready. Now add the garam masala and mix well. Leave to cook for another 2 mins and the dish is ready (in good 20 minutes)!
Garnish with coriander.

P.S: Serve with hot plain parathas.
Njoi Ur Meal!:)
Tuesday, 5 April 2011
# 26: Chocolate-Vanilla Layered Cake with Icing

My Masterpiece! :)
I was at "Tesco" a few days back, and was browsing through their baking section. Amazing variety of things they have. Be it moulds or even colors. I was so tempted to pick up all the colors..so i can work on my icing skills. But aah! mom and sis-in-law were around and lately..rather since some 20 odd years we have stopped using any kind of artificial colors in our food stuff. So.. it was next to impossible for me to pick up all those colors.. Well, but i am an equally hard nut to crack! got my way with Pink & green and am so proud of myself! :D
Going to the recipe...I must tell you the Ingredients for this cake is same as that of the Marble cake. Just that, i worked my way out with getting the layers right and a li'l working on butter icing.
Ingredients & Procedure: http://telangs-grubhub.blogspot.com/2011/04/25-marble-chocolate-cake.html
The technique i adopted to layer is the simplest on the face of earth!
Bottom most layer : Vanilla
Middle: Chocolate
Top : Vanilla
Just that put a good thick layer of each batter.Take a needle and design your cake through...


The Icing:
Ingredients:
- Butter - 30 gms
- Icing sugar - 100 gms
- Vanilla essence - 4 drops
- Drak chocolate - 4 pcs
- Ground Cashews - 1 Tbsp
- Chocolate Oat Crunch Cookies - 6 pcs
- Pink color - 1 drop
- Green Color - 1 drop
- Silver Balls
- Cherries
Butter Paper or Packet
OR
Icing Cone with nozzles
Procedure:
Beat the Butter before adding the icing sugar. Later add the icing sugar to the butter and beat it well. Add the essence. The icing mix has to be such that when you lift the icing, it should be firm and not be even the slightest bit limp!
Do the icing accordingly...
Step 1:

Step 3: Melt the chocolate, add some butter and icing sugar and prepare the chocolate icing for the sides. To put the icing on the sides you can either you the icing moulds & nozzles or create your own icing bag using a packet or butter paper. Just slit the tip of the packet a bit, giving it a shape with which you can determine the design you would like to place at the sides of the cake...I slit the packet such that the shape generated was a "W"

Step 4: The flowers and the leaves. Take a spoon of icing mix to each color. Put 1 drop each and without vigorously mixing, put the icing in respective cones. I used Butter paper to prepare the cones and for the leaves, did a side slit at the tip, while for the flowers cut the tip in a "S"
Step 5: Decorate with Silver Balls & a Cherry! :)

A close up of the piece! I didn't quiet imagine that i would be able to get the zig-zag when i was pouring in the batter..But then..it just worked out!

Have Fun!
# 25: Marble Chocolate Cake
Marble Cake... Something i am so totally fond of. Apart from the several others things i like and love.
I distinctly remember the color combinations my mother used to make when i was a kid.. sometimes there was pink & blue and sometimes it was just blue and its hues and shades. I was always so amazed at the creativity with which she created such master pieces and i still continue to be. Just one difference now. I somehow have an idea about it! :P
Well! after picking up the basic cake making technique.. its high time to start experimenting.
I was gifted a big slab of Lindt Dark chocolate the other day. I totally love dark chocolates! But with the never ending quest to get an inch closer to loosing the extra inches around the waist... Chocolate feasts are near to extinction! And with my family being so hell bent about not using artificial colors.. What best than to get working on a dark chocolate-vanilla flavored marble cake!

Phew! :D Not like i am exhausted already! ;)
After my last attempt on butter cake, and 95% of my family being completely diabetic and dealing with cholesterol! I had to do some minor changes..so here we go..
Ingredients:
- Eggs - 4
- All purpose flour - 250 gms (maida)
- Sugar - 200 gms
- Butter - 200 gms
- Baking Powder - 1 tsp
- Lindt Dark Chocolate - 1/2 slab (32 pcs)
- Vanilla essence - 8 drops
- Lime -1
- Leave the butter out to melt a bit. If its too firm the blade of the beater will get ruined.
- Grind the sugar and keep aside.
- Sieve the Maida and baking powder together.
- Separate the egg whites and yokes.
- Now take the egg white and beat it. Add some ground sugar at regular intervals until it is firm. Such that you can try tossing it over and it would still not fall out or leave any liquid out. Keep aside. Now beat up the yokes in a separate bowl. Squeeze some lime juice into it. And beat well. Keep aside.
- Now, beat up the butter a li'l before you add the sugar to it. Add the remaining sugar to the butter and beat well. Always have one direction while beating up. Else its said the cake wont turn out well.. probably due to the air pockets that get created while mixing up. Anyways!
- Add the beaten yoke mix to the butter and beat it well.
- Now, using a spatula, you need to fold the batter as you add the maida and egg white mix. ( Here you might notice that the egg white is leaving a li'l liquid.. That's perfectly normal and fine...). Continue to add the maida & egg white at regular intervals.. Later add the vanilla essence and fold it as well. (In case the batter it too firm..add 2 tsp of Milk...and fold it together.) Keep aside.
- Melt the chocolate and beat it a bit before you add 2 Tbsp of the Vanilla batter. Fold it with the chocolate and don't beat it up.
- Grease the cake baking mould with butter and sprinkle maida and spread it around well. Now add some vanilla batter into the mould and also add in some chocolate batter in to it. Such that they are equal parts but not really put in any definite pattern or layer. Using a needle. Mix randomly as per the design you wish to see around...
- Bake for 45 mins at 180 degrees. Else in the absence of an oven, bake in a cooker for an hour! (I have been baking my cakes in a pressure cooker lately..and they are just as amazing as they are when baked in an Oven! )

The close up! Just before i took a bite ! :D

Njoi!
(P.S: Recipe continues to the next cake- # 26 :Chocolate-Vanilla Layered cake with Butter icing. )
Sunday, 3 April 2011
The Miracle Drink
Miracle Drink : Carrot, Beet Root and Apple

This MIRACLE DRINK has been circulating for a long time long ago. It is worth your while to take note. There is a celebrity Mr. Seto who swears by it. He wants to make it public to draw the attention of people who have cancers. This is a drink that can protect bad cells forming in your body or it will restrain its growth! Mr. Seto had lung cancer. He was recommended to take this drink by a famous Herbalist from China. He has taken this drink diligently for 3 months and now his health is restored, and he is ready to take a pleasure trip. Thanks to this drink! It does not hurt for you to try.
It is like a Miracle Drink! It is simple
You need one beet root, one carrot and one apple that combine together to make the JUICE !
Wash the above, cut with the skin on into pieces and put them into the juicer and immediately you drink the juice. You can add some lime or lemon for more refreshing taste.

This Miracle Drink will be effective for the following ailments:
- Prevent cancer cells to develop. It will restrain cancer cells to grow.
- Prevent liver, kidney, pancreas disease and it can cure ulcer as well.
- Strengthen the lung, prevent heart attack and high blood pressure.
- Strengthen the immune system
- Good for the eyesight, eliminate red and tired eyes or dry eyes
- Help to eliminate pain from physical training, muscle ache
- Detoxify, assist bowel movement, eliminate constipation. Therefore it will make skin healthy & LOOK more radiant. It is God sent for acne problem.
- Improve bad breath due to indigestion, throat infection,
- Lessen menstrual pain
- Assist Hay Fever Sufferer from Hay Fever attack.
There is absolutely no side effect. Highly nutritious and easily absorbs! Very effective if you need to loose weight. You will notice your immune system will be improved after 2 week routine. Please make sure to drink immediately from the juicer for best effect.
WHEN TO DRINK IT: DRINK IT FIRST THING IN THE MORNING WITH THE EMPTY STOMACH! AFTER ONE HOUR YOU CAN EAT BREAKFAST. FOR FAST RESULTS DRINK 2 TIMES A DAY, IN THE MORNING AND BEFORE 5 P.M.
(P.S: A mail recieved and circulated since a long time...)
(P.S: A mail recieved and circulated since a long time...)
# 24: Creamy Pasta
Pasta!?!?
I am not very crazy about pastas but yes.. I do like some preparations. Normally, I would prefer a red gravy over a white. But there's always an exception. And the exception is PASTA! :)
Like Pizza, Pasta is something I have always had at a restaurant only. Apart from Macaroni which mom used to prepare for us at home.
There was cream & cheese already in the fridge. Could not think of any thing better and quicker than PASTA..and so my experiments with cooking Pasta began. :)
Ingredients:
 (Serves 7)
Boil some water with 1 tsp of salt and add the penne. Leave the penne to cook. Strain the Penne and wash lightly with cold water and strain. Dab some oil in the boiled penne. Mix and leave. (The oil will ensure the penne do not stick to each other or get soggy.)
Heat oil in a pan and add the red chilies to it. Stir a li'l. Add the baby corn and olives as well. Let the 3 cook for a minute or two. Now, add the cheese cubes to it and let it melt into the pan. Later add the cream and leave it to cook.
 Add the Penne to the cream mixture. Mix well. Add salt as per taste as well as sprinkle pepper. Mix well.
The Creamy pasta is all done!

Yummy!!!! :)
I am not very crazy about pastas but yes.. I do like some preparations. Normally, I would prefer a red gravy over a white. But there's always an exception. And the exception is PASTA! :)
Like Pizza, Pasta is something I have always had at a restaurant only. Apart from Macaroni which mom used to prepare for us at home.
There was cream & cheese already in the fridge. Could not think of any thing better and quicker than PASTA..and so my experiments with cooking Pasta began. :)
Ingredients:
 (Serves 7)
- Penne - 1 packet
- Cream - 500 ml
- Cheese - 3 cubes
- Red Chilies - 3 (cut in circular rings)
- Black Olives - 1 cup ( i just love black olives.. )
- Baby Corn - 8 pcs ( circularly cut)
- Oil/Olive oil - 2 Tbsp
- Pepper - 1 tsp
- Salt to taste
- Oregano ( if you like to add else peper is best!)
Boil some water with 1 tsp of salt and add the penne. Leave the penne to cook. Strain the Penne and wash lightly with cold water and strain. Dab some oil in the boiled penne. Mix and leave. (The oil will ensure the penne do not stick to each other or get soggy.)
Heat oil in a pan and add the red chilies to it. Stir a li'l. Add the baby corn and olives as well. Let the 3 cook for a minute or two. Now, add the cheese cubes to it and let it melt into the pan. Later add the cream and leave it to cook.
The Creamy pasta is all done!

Yummy!!!! :)
Bon Appetite!
# 23: The Pizza Mania ( Completely Homemade!)

Ummmmm...I love Pizzas! :)
Somehow, ordering for one is a lot more easier and that's probably why i never ventured out to even try making a Pizza at home. The max i can think was to get the pizza base from the market and just chop a few veggies and bake it!
But what if i could not find the pizza base, and i do not have an oven to do the baking for me.. Sigh!
No worries.. i figured out that i can still have the yummy pizza i am longing for despite all the restrictions. Moreover, it was absolutely amazing to be trying to make the base (for which i had no clue of any recipe and was wholly depending on my instinct and taste buds and the zillion pizzas i have had so far.. ), garnishing with available veggies, and last but not the least pan frying the pizzas as i did not have my oven with me... :)
And all the 4 pan pizzas were ready in just 30 mins. :D
My family & friends loved it as much as i did. Do try it out!
Ingredients:
Base-
- All purpose flour (Maida) - 4 cups
- Curd/yogurt - 2-3 Tbsp
- Cumin seeds - 2 tsp
- Salt - 1tsp
Toppings/Garnishing-
- Parsley - a bunch (chopped)
- Onions - 1 (sliced into rings)
- Tomatoes - 1 (-do-)
- Red Pepper - 1
- Yellow pepper- 1
- Green Pepper-1
- Black Olives - 1 cup ( sliced into rings)
- Red Chilies - 2 (sliced into rings)
- Base sauce : Peri peri sauce & Parmesan Cheese Spaghetti sauce
- Mixed herbs
- Oregano
- Salt to taste
- Cheese (grated)
- Sesame seeds (white)
- Olive oil


Procedure:
Base: Roast the cumin seeds. Add the cumin seeds to the flour. Kneed the maida+cumin seeds+salt using curd. Leave for a while.
Now, roll out the maida dough. While rolling out sprinkle little flour and sesame seeds under the rolled out bread so that when you flatten the bread further the sesame seeds stick to the surface below adding to the crunchiness while pan frying it on the pan.
Garnishing the base:
Step 1: Spread the sauce on the base as shown. Either use peri-peri or the spaghetti sauce or even mix both and spread evenly.

Step 2: Add the toppings starting with parsley, onions, tomatoes, peppers, olives, red chilies, and sprinkle mixed herbs and oregano. Also sprinkle a pinch of salt over it. Grate the cheese and sprinkle some olive oil on it.

Step 3: Place the pizza on the pan and cover it with a lid so it can self cook. Later spread a li'l olive oil around the base. It will ideally take 5-7 minutes to cook and base becomes amazingly crunchy.

Ta da! :)
Take a bite!!! :P
(P.S: you can create different garnishings on all 4 pan pizzas bases and grub on some yummy home made Pizzas .. Have Fun!)
Saturday, 2 April 2011
Eat Healthy..Live healthy :)
Hair is probably one thing that we women are always so concerned and worried about. A thousand shampoos, conditioners, oils, treatments.. etc.. we have no end to it. But i guess, eating right always helps.
The other day i was discussing with my father about hospital food and my observation on hair growth while admitted in hospitals! :P I know you might find it weird but its true... the sheen is also amazing.
It was then that dad told me that it is coz of the hospital food which we so hate to consume... Its afterall the best diet for anyone. Being from the military, the hospital rules, the food, everything is just the best!
Anyways, i was reading through an article posted on Yahoo..and thought i shoul share it with you'll.
" Verbatum"
Happy Eating!!! Eat Healthy..Live healthy :)
What to Eat for Healthy Hair and Nails
By Olivia Putnal
http://shine.yahoo.com/channel/beauty/what-to-eat-for-healthy-hair-and-nails-2460561/
No doubt you know that eating healthy is good for you in a plethora of ways—it can decrease your risk of disease, improve your immune system, increase your energy levels and even affect your sleeping habits. But did you know certain foods can improve the way you look, too? Read on to find out which nutrients will give your hair and nails extra luster, strength and shine.
Biotin/Vitamin H
 Biotin (a.k.a. vitamin H) can improve hair that is splitting or thinning as well as strengthen weakened nails. Taken with zinc and the corticosteroid clobetasol propionate, biotin has even been used to treat alopecia, an autoimmune skin disease marked by the loss of hair. Nina DiBona, RD, dietitian and nutritionist at the Sports Club/LA in Boston, agrees. “A deficiency in biotin may result in brittle hair or even hair loss.” An easy way to remember: The H in vitamin H stands for “haar and haut,” which means “hair and nails” in German, DiBona notes.
Foods to Try: Bananas, beans, cauliflower, eggs, lentils, peanuts and salmon.
Omega-3 Fatty Acids
 To get shinier hair, introduce more omega-3s into your diet, which “help support scalp health and may give your locks extra luster and shine,” according to DiBona. The three active ingredients—alpha-linolenic acid, eicosapentaenoic acid and docosahexaenoic acid—are all essential fatty acids and "are important components of the stratum corneum, which is the outermost layer of the epidermis that contains keratin and has water-holding capabilities. Deficiency in essential fatty acids can result in dry scalp or dandruff," she says.
Foods to Try: Eggs, flaxseed, fish oil, mackerel, salmon, sardines, spinach, tuna and walnuts.
Protein
 Protein intake is important for many reasons, notably when it comes to hair and nails. Both "are made of structural proteins known as keratin, so adequate dietary protein is important for providing the building blocks for growing strong hair and nails,” explains DiBona. Lean meats are the easiest way to pack protein into your diet—just make sure to steer clear of any that are overly fatty.
Foods to Try: Chicken, eggs, lean red meats, lowfat dairy, nuts, seafood, soybeans and whole grains.
Vitamin A
 “Vitamin A helps produce a conditioning substance for the scalp known as sebum, which keeps hair looking and feeling healthy,” says DiBona. In addition to these beauty benefits, this vitamin contributes to better eye health and immune system function, which keeps you vital and strong from head to toe.
Foods to Try: Apricots, broccoli, cantaloupe, carrots, Cheddar cheese, egg yolks, mangoes, oatmeal, spinach and sweet potatoes.
Zinc
 Zinc is another nutrient active in helping the immune system function properly, and DiBona also notes that it plays an important role in the formation of your connective tissues. "Zinc is a component of hundreds of enzymes in the body, some of which regulate the body’s ability to make new proteins that will become building blocks of healthy hair and nails," she says. "Alopecia, hair dryness and brittleness can be signs of zinc deficiency."
Foods to Try: Cashews, green beans, lean beef, lobster, oysters and soybeans.
*Original article appeared on WomansDay.com
Biotin/Vitamin H
Foods to Try: Bananas, beans, cauliflower, eggs, lentils, peanuts and salmon.
Omega-3 Fatty Acids
Foods to Try: Eggs, flaxseed, fish oil, mackerel, salmon, sardines, spinach, tuna and walnuts.
Protein
Foods to Try: Chicken, eggs, lean red meats, lowfat dairy, nuts, seafood, soybeans and whole grains.
Vitamin A
Foods to Try: Apricots, broccoli, cantaloupe, carrots, Cheddar cheese, egg yolks, mangoes, oatmeal, spinach and sweet potatoes.
Zinc
Foods to Try: Cashews, green beans, lean beef, lobster, oysters and soybeans.
*Original article appeared on WomansDay.com
Subscribe to:
Posts (Atom)